
Front lever progression
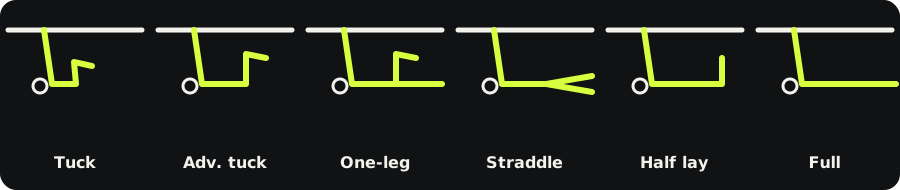
The front lever progression takes you from hanging on a bar to holding your body flat and level beneath it, arms straight. It is a chain of holds, each a longer lever than the last: tuck, advanced tuck, one-leg or straddle, half lay, and the full front lever. This guide gives every step with the hold you need before moving on, the form that counts and the faults that do not.
Before you start the front lever progression
You need a bar or rings you can hang from with your feet clear, and two things on the Calisthenics Rep Counter tree first: a pull-up (3 × 5 clean reps) and a hollow body hold (3 × 30 s clean). The tuck front lever needs both. If the pull-up is not there yet, the band front lever needs only an active hang and the hollow hold, so you can start learning the shape now.
The front lever progression, step by step
Dead hang · Beginner
Hang from the bar with straight arms. Grip and shoulders that can hold you for a minute are the base of every lever.
Unlock standard: 60 s clean.
Hollow body hold · Beginner
Lie on your back, lower back pressed down, arms and legs long and off the floor. This is the body line of the lever, on the floor.
Unlock standard: 3 × 30 s clean (milestone 60 s).
Band-assisted front leverassisted · Moderate
A band from the bar under your hips takes part of your weight, so you can hold the full body line early and learn it.
Unlock standard: 3 × 10 s clean.
Tuck front lever · Moderate
Pull your knees to your chest and lift until your back is level with the floor, arms straight. A rounded back is fine here.
Unlock standard: 3 × 15 s clean.
Form: Arms straight, shoulders depressed; Hips level with shoulders; Posterior pelvic tilt (no arch).
Watch for: hips sagging below shoulders; bent arms; rounded/hunched shoulders.
Advanced tuck front lever · Advanced
Open the hips to 90° and flatten the back: same tuck legs, much longer lever. Most people stay here longest.
Unlock standard: 3 × 15 s clean, back flat.
Form: Arms straight, shoulders depressed; Hips level with shoulders; Posterior pelvic tilt (no arch).
Watch for: hips sagging below shoulders; bent arms; rounded/hunched shoulders.
One-leg front lever · Expert
One leg straight, one tucked; swap legs between sets. For some people the straddle comes first: use whichever you can hold.
Unlock standard: 3 × 10 s per leg.
Form: Arms straight, shoulders depressed; Hips level with shoulders; Posterior pelvic tilt (no arch).
Watch for: hips sagging below shoulders; bent arms; rounded/hunched shoulders.
Straddle front lever · Expert
Both legs straight and wide. The wider the straddle, the shorter the lever; close it a little each week.
Unlock standard: 3 × 10 s clean.
Form: Arms straight, shoulders depressed; Hips level with shoulders; Posterior pelvic tilt (no arch).
Watch for: hips sagging below shoulders; bent arms; rounded/hunched shoulders.
Half-lay front lever · Expert
Legs together, knees bent to about 90°, hips open: the last step before full.
Unlock standard: 3 × 8 s clean.
Form: Arms straight, shoulders depressed; Hips level with shoulders; Posterior pelvic tilt (no arch).
Watch for: hips sagging below shoulders; bent arms; rounded/hunched shoulders.
Full front lever · Expert
Body straight, legs together, level with the floor, arms locked. Ten clean seconds is the expert standard.
Unlock standard: 10 s clean (milestone: 3 s).
Form: Arms straight, shoulders depressed; Hips level with shoulders; Posterior pelvic tilt (no arch).
Watch for: hips sagging below shoulders; bent arms; rounded/hunched shoulders.
Count only the seconds in form
A lever hold is only as long as the time your form held. Count from the moment your body is level and your arms are straight, and stop the moment your hips drop below your shoulders or your elbows bend, even if you are still hanging there. That is how Calisthenics Rep Counter times a hold with the camera from the side: the clock runs only while the shape is right, and pauses when it is not.
Exercises that build the lever
| Tier | Family | Move | Unlock standard | Needs |
|---|---|---|---|---|
| Moderate | Front lever | Tuck front lever raise | 3 × 8 from inverted hang | Tuck front lever |
| Advanced | Front lever | Ice cream maker (tuck) | 3 × 5 | Tuck front lever, Pull-up |
| Advanced | Rows | Tuck front lever row | 3 × 6 holding tuck | Tuck front lever, Inverted (Australian) row |
| Expert | Rows | Advanced tuck front lever row | 3 × 5 | Tuck front lever row, Advanced tuck front lever |
| S | Rows | Front lever row | 3 × 3 clean | Full front lever, Advanced tuck front lever row |
| S | Front lever | Front lever pull-up | 1 clean rep | Full front lever |
Do one or two of these after your holds, two or three times a week. Pulling strength carries over too: weighted and chest-to-bar pull-ups are on the pull-up progression.
See where the lever sits among everything else in the calisthenics skill tree.
Climb it with Calisthenics Rep Counter. Calisthenics Rep Counter is a push up counter app with this whole tree inside: prop the phone and the camera counts the moves it can read and times holds in form, every set goes into your log, and stripe three on each move unlocks the next. Logging and the whole tree are free forever.
Get it on Google Play About Calisthenics Rep CounterQuestions
How long does the front lever progression take?
Most people who train it two or three times a week reach the tuck in months and the full front lever after two to four years of training; the advanced tuck is the step people stay on longest. Your pace depends on bodyweight, limb length and how consistently you train it.
How long should I hold each front lever progression?
Move on when you can hold the current step for its unlock standard in good form: 3 × 15 s for the tuck and the advanced tuck, 3 × 10 s for one-leg and straddle, 3 × 8 s for the half lay, and 10 s for the full front lever.
Is the straddle or one-leg front lever easier?
It depends on your hips and legs. Both come after the advanced tuck; train whichever you can hold, and use the other as a variation.
Why do my hips drop in the front lever?
The lever is longer than your strength at that step, or your core is not braced. Go back a step, tuck a little more, squeeze your glutes and tilt your pelvis under (no arch), and keep pulling the bar toward your hips with straight arms.